Hi!
I am working on the Timeline and my guys would like to see the full 24h of the day they are working on plus 8h of the day after to facilitate the night shift managing. So if i go on today, I would like to see the whole 24h hours of the 3rd of July plus the 0:00 to 8:00 of the 4th of July. Then, when I go on tomorrow, I see the 24h of the 4th of July and the 0 to 8 of the 5th of July.
Is this something possible?
I saw that I could load 2 days so I can see the 3rd and the 4th. But when I click to go on the next day, it goes to the 5th and the 6th rather then the 4th and the 5th. Maybe there would be a work around with that?
Nicolas
Hello @Nicolas 
At the moment, you won’t be able to show a custom 32-hour view on the Timeline. While it is not supported at the moment, I would be more than happy to pass this on to the product team and add your voice to it.
Besides that, as you mentioned an alternative solution would be to show a 2-day Timeline view and disable the hours with the invalid option which you don’t want to use. Then, you can create a custom navigation with which you can solve to navigate day by day.
Let me know what you think.
Well, if there is a way to have a day by day navigation while showing 2 days, that would be good for me.
I’m pretty new to Mobiscroll so for the customisation, is there something built in to help with the navigation or I would have to code it on my side?
Sure, @Nicolas, here are the building blocks that you need to use to implement the view and custom navigation:
- First you’ll have to modify the
view option to be type: ‘day’ like: view: { timeline: { type: "day", size: 2 }} → this will render 2 days on the Timeline view
- Use the
renderHeader option to add custom navigation buttons, which will allow you to override the default navigation.
- For creating a custom navigation you’ll have to use the selectedDate and the refDate options. The navigate method will help you navigate to another view programmatically, and the
refDate will help specify the reference date for the view calculation
In this demo there is an example of how you can add custom navigation buttons to the header, however in your case you’ll also need to introduce the refDate option update as well.
Please let me know if this helps!
It really helped! I had missed the refDate in the documentation but that was basically what I was looking for. I followed the demo and trimed a bit to get only what I needed but it worked perfectly.
Here is the code I ended up with :
const navigatePage = useCallback(
        (prev) => {
            const prevNextPage = new Date(mySelectedDate.getFullYear(), mySelectedDate.getMonth(), mySelectedDate.getDate() + (prev ? -1 : 1));
            console.log(prevNextPage);
            setSelectedDate(prevNextPage);
        },
        [mySelectedDate],
    );

    const customWithNavButtons = useCallback(
        () => (
            <div className='header-calendrier'>
                <CalendarNav className="md-custom-header-nav" />
                <div className="md-custom-header-controls">
                    <Button
                        onClick={() => navigatePage(true)}
                        icon="material-arrow-back"
                        variant="flat"
                        className="md-custom-header-button"
                    ></Button>
                    <CalendarToday className="md-custom-header-today" />
                    <Button
                        onClick={() => navigatePage(false)}
                        icon="material-arrow-forward"
                        variant="flat"
                        className="md-custom-header-button"
                    ></Button>
                </div>
            </div>
        ),
        [navigatePage],
    );
And I assigned the selectedDate value to the refDate so it is always the first of the 2 days :
<Eventcalendar
                className="md-work-order-scheduling"
                view={viewSettings}
                data={myEvents}
                resources={myResources}
                clickToCreate="double"
                dragToCreate={true}
                dragToMove={true}
                dragToResize={true}
                dragTimeStep={30}
                selectedDate={mySelectedDate}
                onSelectedDateChange={handleSelectedDateChange}
                onEventClick={handleEventClick}
                onEventCreated={handleEventCreated}
                onEventDeleted={handleEventDeleted}
                renderDay={renderCustomDay}
                renderScheduleEventContent={myScheduleEvent}
                onEventDragStart={handleEventDragStart}
                onEventDragEnd={handleEventDragEnd}
                refDate={mySelectedDate}
                renderHeader={customWithNavButtons}
            />
1 Like
Glad to hear you managed to solve your requirement, @Nicolas 
Hi @Nicolas
We’ve just shipped Mobiscroll 6, which includes the long-awaited shifted days feature for the Timeline view.
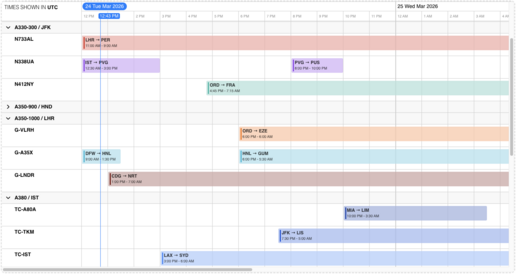
Shifted day support lets you redefine the boundaries of a day, making it possible to display hours from the previous or following day within the same view. For example, you can configure a view from 6 AM to the next day’s 6 AM, show an 18:00–08:00 overnight shift, or extend the day slightly past midnight to capture late-night activity. All of this can be done using the view option’s startTime and endTime properties (for example '18:00-1', '08:00+1').
Live example: https://demo.mobiscroll.com/timeline/36-hour-rolling-window-aircraft-view👇
You can also check our upgrade guide for a detailed overview of the changes.
